

How to Make a Dog Crate Divider
How To Make A Dog Crate Divider

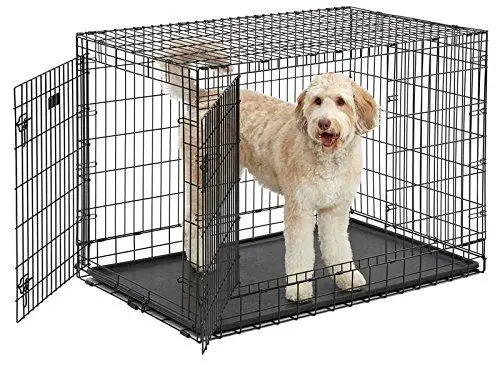
This is our Top Pick for the number 1 best Dog Crate Divider. The iCrate is considered to be an "all inclusive dog crate" as it includes a FREE divider panel , a very high quality durable dog tray, along with a sturdy carrying handle, in addition to 4 roller feet to protect your floors. This crate also comes with a 1 Year Manufacturer warranty. So it doesn't matter if it breaks or the dog damages it. You will get a brand new replacement unit courtesy from the factory.

It's virtually escape proof and extremely easy to fold up and pack way. Also great to be used around the house and ease of use while travel. This dog crate has the thickest and the most heavy duty wire gauge on the market compared to all dog crates out there. It comes with a free dog crate divider, is excellent for your hard wood floors since it comes with rubber footings.
The best crate size for any dog is one which allows it to stand and turn around without restriction. This often means that the crate will have too much extra space for a small puppy. This extra space will encourage the puppy to relieve itself in the crate and defeat the purpose of crate training in the first place.

The easiest way to solve this problem would be to simply put a crate divider that can be removed once the puppy grows into adulthood. Listed below are a few tips and tricks to help you make your own divider at home.
Why Crate Train
Before anything else, it is best if you know the purpose of crate training in the first place. Crate training is one of the simplest methods that you can use to potty train a new puppy. The crate serves as a designated area. As such, it should only be large enough to fit a few cushions or a blanket and some food bowls.
The puppy should be trained to only relieve itself once it is led out of the crate. However, a large crate will enable the puppy to pee on one end and still sleep peacefully on the other end. A crate divider can help you restrict the space that your puppy can move around in without forcing you to spend on a smaller crate and buying a new crate every few months. Likewise, a divider can be made using simple household materials that you can easily find at home.
What Materials Can Be Used
A puppy is prone to committing small accidents every now and then while it is being crate trained. For this reason, it is best if you use simple and affordable household materials for your crate divider. Remember that this divider will only be used temporarily so there is no need to spend on a professionally-made divider.
Here is a basic list of the materials needed:
- Large sturdy cardboard
- Tape measure
- Meter stick or ruler
- Marker or pencil
- Scissors or cutter
- 4 pieces of wire or cable ties that are at least 6 inches long
For Teething Puppies or Chewers
If your puppy is in its teething stage or if the breed is a known chewer, it would be better to replace the cardboard with a thin piece of plywood instead. You can simply cut the plywood to the proper size and use a drill or nail to make four holes in each corner.
Set the Size
Put your puppy inside the crate to make it easier to determine the appropriate temporary crate size. Make sure that the puppy will still have enough room to move around in in the allotted space. Your pet should be able to stand up, turn around, and stretch out with ease. Mark the spot inside the crate where you want to place the divider.
Measure the Crate
Use the tape measure to get the dimensions of the crate’s interior. Measure the crate from one side to the other to get the proper width. Measure the crate from top to bottom to get the proper height. Mark a half inch allowance to ensure that the divider will fit snugly in place.
Mark the Board
With the gathered measurements, mark the cardboard or plywood with a ruler and a pen. Cut the cardboard to the right height and width using a pair of sharp scissors. If you have a steady grip, a box cutter can also provide a cleaner and straighter line.
The plywood can be cut using a handsaw and then sanded to remove any sharp splinters. Remember that your puppy will be in close proximity with this divider so you should make sure that there will be no sharp edges left that can cause it to injure itself.
Attach the Divider
Punch or drill holes into each corner of the cardboard or plywood. Thread the wire or cable tie through the hole but do not tie it yet.
Place the makeshift divider inside the crate and secure it in place by twisting the wires or ties around the bars. Make sure that the sharper ends are secured outside the crate since these can easily injure a curious puppy. You can also opt to cut the excess wires once the divider is in place.
Handling Your Puppy
Once the divider is in place, your puppy should learn to stay only in the allotted space without pushing against the divider. However, if your puppy turns out to be more destructive than you first thought, then you might consider simply removing the divider altogether to prevent your dog from hurting himself.
As your puppy grows, you will find that he will learn not to have any more accidents inside the crate. Most dogs do not enjoy sleeping in their own filth so they will try to keep their sleeping area as clean as possible.
In the end, what is most important is that you create a routine that allows your puppy to know when it should eat, when it should sleep, and when it should relieve itself. Eventually, once your puppy has mastered this routine, you can then take the divider out and allow the puppy to fully enjoy his crate.
If you’re a proud pet owner of a new puppy, you’ll soon realize that crate training is an essential part of potty training and keeping your dog safe and secure. However, as your puppy grows, you may find that they have too much room in their dog’s crate and you’re on a tight budget to buy a new one. That’s where the idea of making a dog crate divider comes in. By using cardboard or plywood and a few basic tools like a scissor, box cutter, and sandpaper, you can easily make a DIY dog crate divider that fits inside your pup’s crate, reducing the space to accommodate your growing dog. With a divider, you can control the amount of space your dog has, making it smaller as your puppy grows and reducing the need for buying a new crate. In this guide, we will show you how to measure your dog’s crate, prepare the divider, and install it using cardboard or plywood, so your pup will have the perfect space to go to the bathroom, play, and sleep.
Why A Dog Crate Divider Is Essential For Your Puppy’s Comfort
A dog crate divider is an essential tool for pet owners who want to ensure their puppy’s comfort and safety. As your dog grows, you may need to make a dog crate smaller to accommodate its size. A divider panel can help you subtract the right amount of space inside the crate so that your dog won’t feel cramped. With a crate divider, you can control the size of the crate tray and keep it proportionate to your dog’s size. Not all crates come with a divider, but you can easily purchase or make one yourself using cardboard or hard plastic. Installing a divider inside the crate is simple and requires only basic tools like a pair of scissors and a drill. A crate divider can help prevent your dog from having too much space, which might lead to toileting outside the designated area. Additionally, it can also provide two smaller sleeping areas for your pup. By using a crate divider, you can ensure that your dog will have the perfect space to play, sleep, and go to the bathroom. So, don’t hesitate to get a crate with a divider or make one at home, it will make all the difference for your pup’s comfort.
Measuring Your Dog To Make The Perfect Crate Divider
A dog crate divider is an essential tool to make a wire crate smaller for a puppy or to provide the right amount of space for an adult dog. Without a divider, the crate might be too big, causing your puppy to feel cramped or to go to the bathroom in one end of the crate. To ensure the perfect fit, it’s crucial to measure your dog and the crate to make accurate measurements of the crate size. With these measurements, you can calculate the size of the divider panel and make sure it will fit inside the crate and line up against the crate tray. By using a crate divider, you can provide your dog with the right amount of space for sleeping, toileting, and standing, without wasting any space or compromising their comfort.
Materials You Need To Make A Dog Crate Divider: Cardboard, Ruler, And More
Making a dog crate divider is a simple and affordable way to customize the space inside your pet’s crate to meet its needs. You will need a few materials to get started, including cardboard, a ruler, zip ties, and a punch tool or drill. To make the divider, you will need to measure the interior dimensions of your crate and determine how much space your puppy needs to stand and move around comfortably. Cut a piece of cardboard to size, making sure to add about half an inch to allow room for a snug fit. Place the divider inside the crate and secure it in place with zip ties. Punch or drill holes along the upper edge of the divider to create a line against the crate tray. To ensure a good fit, place the divider outside the crate and fit it inside, making any necessary adjustments. The divider can be moved as your puppy grows and requires more space inside the crate.
Step-By-Step Guide: Preparing And Installing The Divider In Your Pet Crate
Here is a step-by-step guide for preparing and installing a divider in your pet crate:
- Measure the space of your puppy’s crate and make a cardboard divider to fit its size. Add 3 inches to the length, width, and height of the crate.
- Cut the board according to the measurements, making sure it fits crosswise or lengthwise from the floor to the top.
- Drill or punch holes into each corner of the cardboard divider.
- Remove the top half of the crate door so that your puppy can stand and move freely inside the crate.
- Place the divider in the crate and fit it tightly against the crate tray.
- Secure the divider to the crate using zip ties.
- If needed, move the divider as your puppy grows to give them more space inside the crate.
- Make sure the divider is sturdy and won’t shift around or collapse.
Note: This guide is suitable for metal and hard plastic crates, but may vary for other types of crates, such as kennels. Crates made for adult dogs may not come with a divider, but dividers can be added to make a smaller space for your growing pup.
Tips To Make The Most Out Of Your Large Crate And Keep It Smaller For Your Pup
A dog crate divider is a useful tool to make the most out of your large crate and keep it smaller for your pup. By using a divider, you can customize the size of the crate to fit the space of your pup’s. This will ensure that the crate is not too large and overwhelming for your pup, and will help keep your puppy comfortable and secure inside the crate. Here are some tips to make the most out of your large crate and keep it smaller for your pup:
- Use a divider: Crates come in all shapes and sizes, but they can often be too big for your pup. A divider can help you customize the size of the crate to fit the space of your pup’s. This will ensure that the crate is not too large and overwhelming for your pup.
- Measure the crate: Before you get started, measure the inside of your crate and make sure you have the right size divider. Make sure to take into account the space your pup needs to stand, turn around, and lay down comfortably.
- Place the divider in the crate: Once you have the right size divider, place it in the crate and secure it with zip ties or similar fasteners. Make sure the divider fits snugly and does not move around inside the crate.
- Consider the size of your pup: Keep in mind that pups grow very fast, so it’s important to measure the size of your pup and make sure the divider is adjusted accordingly. You may need to move the divider or get a new one as your pup grows.
- Use metal or hard plastic crates: Crates made of metal or hard plastic are more durable and secure than cardboard dividers. If you have a metal or hard plastic crate, consider using a divider made of metal or hard plastic as well.
- Watch out for holes: Make sure that the divider doesn’t have any holes or gaps that your pup could escape through. If there are holes, use zip ties or similar fasteners to cover them up.
- Keep an eye on your pup: Make sure to monitor your pup when they are inside the crate, especially if they are new to using a crate. This will help you make sure the divider is working properly and that your pup is comfortable and secure.
Conclusion
In conclusion, a dog crate divider is an essential tool to make your pet’s crate smaller and more comfortable. By using a divider, you can keep your puppy in a space that fits their size, which will prevent them from feeling cramped or overwhelmed. Whether you choose to make your own divider or purchase one, it is important to measure the crate and the pup to ensure the right fit. By doing so, you can ensure that your dog has a safe and cozy place to sleep, play and relax. With the right divider, you can make the most out of your metal crate or kennel, and keep it smaller for your growing pup.
Frequently Asked Question (FAQs)
If you’ve still got questions about How to make a dog crate divider, then these may help:
What Can I Use Instead Of A Crate Divider?
There are several alternatives to using a crate divider for a dog’s crate. Some options include using furniture like a bookshelf or a piece of wood to block off a portion of the crate, using a baby gate to create a smaller space within the crate, or using a smaller crate for the dog to sleep in. Additionally, some metal crates come with adjustable panels or have the option to purchase separate panels to create a smaller space. It’s important to ensure that the alternative provides the necessary space for your dog to stand, turn around and sleep comfortably while still being secure and safe.
How Can I Make My Dog Crate Smaller Without Divider?
If you don’t have a crate divider, you can still make your dog crate smaller for your pup by using other materials. One option is to use a piece of cardboard or foam board cut to size, placed inside the crate to create a smaller space for your dog. Another option is to use pillows, blankets, or towels to fill the extra space and create a smaller area for your pup. You could also consider using a smaller crate that’s appropriate for your dog’s size and then upgrading to a larger crate as your dog grows. It’s important to make sure that your pup has enough room to stand up, turn around, and lie down comfortably.
What Is The Purpose Of A Divider In A Dog Crate?
The purpose of a divider in a dog crate is to create a smaller space within the crate that is suitable for a puppy or a new dog. This allows the dog to have a comfortable and secure space to stand and lie down in, and can also prevent the dog from using one end of the crate as a bathroom area. The divider can be adjusted as the dog grows, providing a secure and comfortable space for the dog throughout its life. The divider can be made at home using cardboard and other materials and can be fit into most metal crates.
How Do You Measure A Dog For A Plastic Crate?
To measure a dog for a plastic crate, follow these steps:
- Measure the length of your dog from the tip of its nose to the base of its tail.
- Measure the height of your dog from the floor to its shoulders.
- Measure the width of your dog from the widest part of its rib cage.
- Choose a plastic crate that is long enough for your dog to comfortably stand up, lie down, and turn around in.
- Consider using a divider if the crate is too large for your dog, to prevent it from using one end of the crate as a bathroom and the other end as a sleeping area.

